Theming & Customization
Global Stylesheet / Javascript
QOR Admin will auto-load javascripts and stylesheet files based on your Admin's SiteName
For example, say you set the site name to Qor Demo, QOR Admin will look up {qor view paths}/assets/javascripts/qor_demo.js and {qor view paths}/assets/stylesheets/qor_demo.css, and load them if present.
View Paths
When QOR Admin render pages, it looks up templates with AssetFS.
A default implemention of AssetFS is looking up templates from the filesystem with pre-registered view paths.
it includes:
- {current_path}/app/views/qor
- {current_path}/vendor/github.com/qor/admin/views
- $GOPATH/src/github.com/qor/admin/views
Checkout AssetFS for more details
Themes
QOR Admin provides flexible template customization. You can define your own theme for a resource.
A custom theme for a Resource in QOR Admin can be applied using a custom javascript and CSS file. To apply a custom theme, set the theme name using the UseTheme method, this will load assets/javascripts/fancy.js and assets/stylesheets/fancy.css from the theme path.
For example:
product := Admin.AddResource(&Product{})
product.UseTheme("fancy")
This means {qor view paths}/themes/fancy/assets/stylesheets/fancy.css and {qor view paths}/themes/fancy/assets/javascripts/fancy.js will be loaded when request products.
Customize templates
QOR Admin is using go templates to render admin interface, default templates could be found from https://github.com/qor/admin/tree/master/views
You might want to customize some of them based on your requirements
Then, you can put a new template with the same name to QOR View Paths, QOR Admin will load templates based on priority.
QOR Admin will look up templates from those paths, top paths will have higher priority
- {qor view paths}/themes/{theme name}/{resource params}/{template}
- {qor view paths}/themes/{theme name}/{template}
- {qor view paths}/{resource params}/{template}
- {qor view paths}/{template}
Then:
Overwrite
layout.tmplfor the whole siteYou can create a file named
layout.tmpland put into{current_path}/app/views/qorOverwrite
layout.tmplfor a resourceIf you want to overwrite layout for a specified resource, you could put the file to
{qor view paths}/{resource's params}, e.g:To overwrite Product's layout, create a file named
layout.tmpland put it into{current_path}/app/views/qor/productsOverwrite
layout.tmplfor a collection of resourcesSet same theme name for those resources with UseTheme
res.UseTheme('fancy')Then putlayout.tmplto{current_path}/app/views/qor/themes/fancy/layout.tmpl
Menus
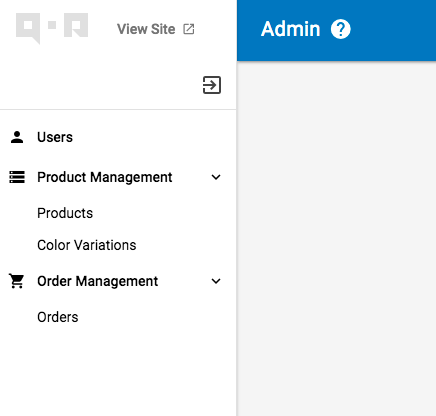
QOR Admin provides a flexible way to manage menus. By default, Resource will be listed at the top level of the menu. You can set the position manually.
Admin.AddResource(&User{})

Admin.AddResource(&Product{}, &admin.Config{Menu: []string{"Product Management"}})
Admin.AddResource(&Color{}, &admin.Config{Menu: []string{"Product Management"}})
Admin.AddResource(&Size{}, &admin.Config{Menu: []string{"Product Management"}})

Admin.AddResource(&Order{}, &admin.Config{Menu: []string{"Order Management"}})
This will generate menus like this:
If you don't want a resource to be displayed in the menu, pass the Invisible option:
Admin.AddResource(&User{}, &admin.Config{Invisible: true})
Register a menu with custom URL
You can add menu with custom URL, like this
// Register Menu `Sales Report`, The "menu" under "Reports"
Admin.AddMenu(&admin.Menu{Name: "Sales Report", Link: "/admin/sales_report", Ancestors: []string{"Reports"}})

// Register Menu `Sales Report` with RelativePath, the finally URL will be admin's endpoint + RelativePath, `/admin/sales_report` for this example.
Admin.AddMenu(&admin.Menu{Name: "Sales Report", RelativePath: "/sales_report", Ancestors: []string{"Reports"}})
Menu Permission
// Register menu with permission, User has "admin" permission could see the "Report" menu.
Admin.AddMenu(&admin.Menu{Name: "Report", Link: "/admin/reports", Permission: roles.Allow(roles.Read, "admin")})
Please check Authentication for more permission control informations.
Menu Priority
Set Menu's Priority with Priority, small number has higher priority, negative number has the lowest priority
Admin.AddMenu(&admin.Menu{Name: "First Menu", Priority: 1})
Admin.AddMenu(&admin.Menu{Name: "Second Menu", Priority: 2})
Admin.AddMenu(&admin.Menu{Name: "Third Menu", Priority: 5})
Admin.AddMenu(&admin.Menu{Name: "Forth Menu", Priority: -2})
Admin.AddMenu(&admin.Menu{Name: "Last Menu", Priority: -1})
Configure your own menu icon
QOR Admin uses icons from material icons, and pre-generated attribute name on each menu. So it is very easy to customize your own menu icon.
Assume you are adding an icon to Product. First, go to material icons page and pick the icon you wanted then copy the content in the screenshot
![]()
Then put it in the CSS, about how to customize CSS for QOR Admin go check QOR Admin theme.
[qor-icon-name*="Products"] > a::before {
  content: "\E2BF";
}
Go to QOR Admin, you should see the icon has been displayed beside the product menu.
If you don't want to use the resource name as the icon name. You can use IconName like this
Admin.AddResource(&User{}, &admin.Config{IconName: "YouOwnIconName"})
The corresponding css of the menu icon would be
[qor-icon-name*="YouOwnIconName"] > a::before {
  content: "\E2BF";
}